
Overview
OnSync for SIRAS allows OnDataSuite to automatically retrieve Special Education data files from your district’s SIRAS sFTP site on a scheduled basis. Once configured, OnDataSuite will regularly import the selected SIRAS files without requiring manual uploads.
Before OnSync can be configured, a district administrator must first enable the SIRAS partner integration and accept the required Memorandum of Understanding (MOU).
Prerequisites
Before beginning, obtain the following information from SIRAS:
- SIRAS sFTP Username
- SIRAS sFTP Password
- Confirmation of the student and/or service file names available in your SIRAS sFTP folder
Note: The SIRAS username is often your district’s 7-digit CDS code, but this may vary. Verify your credentials directly with SIRAS before proceeding.
Step 1: Enable the SIRAS Partner Integration
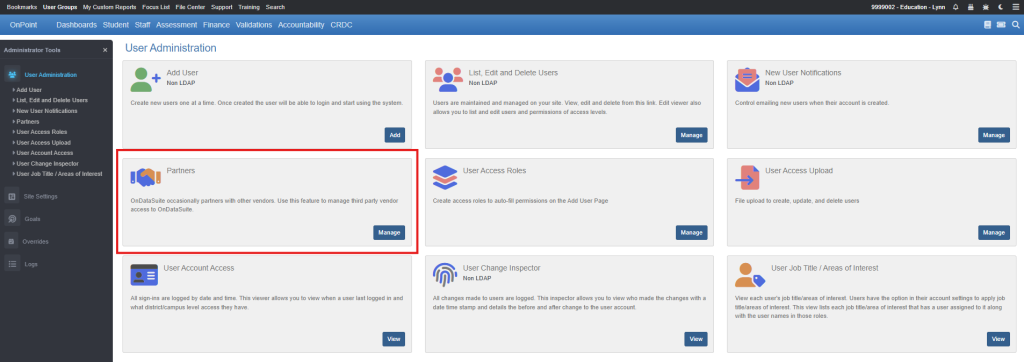
- Navigate to Administrator Tools.
- Select Partners under User Administration.
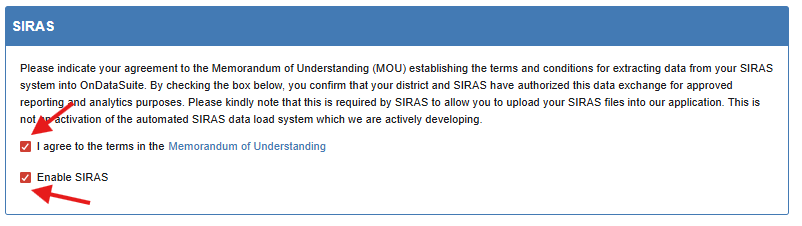
- Locate the SIRAS section.
To enable the integration:
- Check I agree to the terms in the Memorandum of Understanding.
- Check Enable SIRAS.
The MOU confirms that your district authorizes OnDataSuite to retrieve data from SIRAS for reporting and analytics purposes.
Important: Enabling SIRAS does not activate automatic synchronization by itself. It only makes the OnSync for SIRAS configuration options available.
Step 2: Open the OnSync Configuration Page
- Navigate to File Center.
- Select OnSync.
- Scroll down to the OnSync for SIRAS section.
This section will only appear after SIRAS has been enabled on the Partners page.
Step 3: Activate OnSync for SIRAS
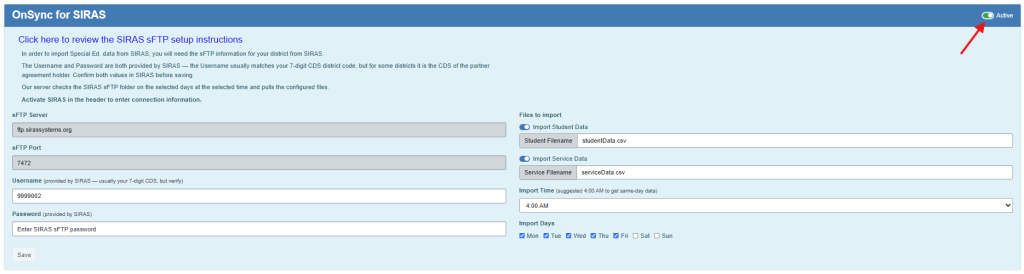
At the top-right corner of the OnSync for SIRAS panel, enable the Active toggle.
When enabled, OnDataSuite will attempt to connect to the SIRAS sFTP server according to the schedule you configure.
You can also use this toggle later to temporarily pause imports without deleting your configuration settings.
Step 4: Enter SIRAS Connection Information
Complete the following fields:
| Field | Description |
|---|---|
| sFTP Server | SIRAS server address. The default value is typically ftp.sirassystems.org. |
| sFTP Port | SIRAS sFTP port. The default value is typically 7472. |
| Username | Provided by SIRAS. Often your district’s CDS code. |
| Password | Provided by SIRAS. |
Note: The server and port values are pre-populated with the standard SIRAS settings and normally do not need to be changed.
Step 5: Select Files to Import
Choose which SIRAS files should be imported:
Import Student Data
Enable Import Student Data and specify the student data filename.
Typical filename:
studentData.csv
Import Service Data
Enable Import Service Data and specify the service data filename.
Typical filename:
serviceData.csv
Only enable the files your district intends to import.
Step 6: Configure the Import Schedule
Import Time
Select the time each day that OnDataSuite should check the SIRAS sFTP site for updated files.
Recommendation: SIRAS recommends scheduling imports around 4:00 AM to maximize the likelihood of receiving same-day updates.
Import Days
Select the days of the week when imports should run.
Many districts choose:
- Monday
- Tuesday
- Wednesday
- Thursday
- Friday
Weekend imports can also be enabled if desired.
Step 7: Save the Configuration
After all settings have been entered:
- Click Save (or Update if editing an existing configuration).
- Verify that the settings are saved successfully.
The OnSync service will begin checking the configured SIRAS sFTP folder according to the schedule you selected.
Monitoring Synchronization Status
The SIRAS Sync Status panel displays the results of the most recent synchronization attempt.
The status area includes:
- Date and time of the last synchronization
- Success or error messages
- Current connection status
Review this area after initial setup to confirm that OnDataSuite is successfully connecting to SIRAS and importing files.
Troubleshooting
The “OnSync for SIRAS” section does not appear
Verify that:
- The SIRAS MOU has been accepted.
- Enable SIRAS is checked on the Partners page.
Imports are failing
Verify:
- Username and password are correct.
- File names match the files available in your SIRAS sFTP folder.
- The Active toggle is enabled.
- The sync status area contains any reported error messages.
If issues persist, contact OnDataSuite Support and provide the message shown in the SIRAS Sync Status panel.